The baby shower that my Mom and I are throwing for my brother Jonathan and his girlfriend, Sarah is this weekend and I still have a few projects to cross off my to-do list but I wanted to show you guys one of the cool things I made that will add a neat touch to our decor.
Mom saw in a magazine a craft project where someone covered tin cans in fabric and ribbon and used them as utensil holders. She told me all about them, showed me the picture in the magazine and said, "You can make these, right?"
Sure I can, because I'm AWESOME!
And because Mom made a trip to Jo-Ann's so that she could buy fabric and ribbon that color coordinated with our colors for the shower.
So I present to you...
Fabric Utensil Holders!!!
Supplies:
clean tin cans
fabric
ribbon
craft glue
scissors
pinking shears
measuring tape
sponge brush
After making sure that the cans were clean and removing the labels, I was ready to start. I first measured the circumference of the can, then added half an inch.
Then I measured the height of the can and added 1 1/2 inch.
sponge brush
After making sure that the cans were clean and removing the labels, I was ready to start. I first measured the circumference of the can, then added half an inch.
Then I measured the height of the can and added 1 1/2 inch.
Then I cut out a rectangle of fabric using my measurements.
I took the can and traced the bottom circle onto the fabric to cut out for the bottom piece.
Once I had all my pieces cut it was time to start gluing. I squirted my craft glue directly on the can and used a sponge brush to get the right amount of coverage I needed. Then I applied the fabric to the can, leaving plenty of fabric on the top and bottom for the next steps.
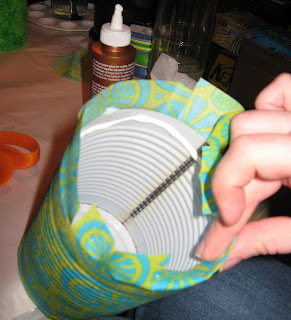
After gluing the fabric to the can, it's time to deal with the excess at the top and the bottom. At the top, make small even cuts around the top so it will fold nicely into the can.
Once the slits are cut, apply a ring of glue around the top lip of the can. Then smooth the fabric down inside the can.
When the top is done, it's time to move on to the bottom, which is pretty much the same. Cut even slits around the fabric at the bottom of the can. Then apply a ring of glue and smooth the fabric down to the bottom of the can.
Once the bottom slits of fabric are glued down, apply a ring of glue and glue the circle of fabric that you traced out to the bottom of the can, which hides all the folds from the side fabric.
When you have all the fabric glued to the sides and bottom of the can, then you can decorate it as you want. Since I made a few cans, I used the pinking shears and used them to cut strips of coordinating fabric that I glued around two of the cans. I also used ribbon to add embellishment. But you could do any sort of embellishment, rosettes, rhinestones, charms, etc.
I love how these turned out! Even Amazing Boyfriend commented on how well they turned out. And I'm happy because I know they're going to add that little extra touch to our baby shower.
I'm sharing this project at the following link parties:


Those are too cute... may do that for my next party.
ReplyDeleteDefinetly made those cans look way prettier. Turned out great!!
ReplyDeleteThanks for linking up to Your Whims Wednesday :)
This came out really great! Thanks so much for linking this up to our Wicked Awesome Wednesday link party!
ReplyDeleteThis turned out beautiful! I love the blue and green here! I know they were a big hit!
ReplyDeleteAdorable!! I am a new follower!!! I am visiting from Tatertots and Jello and I would LOVE if you could link up your awesome post to my very first crafty linky party! This is the first week of Delicately Constructed Fridays and I would really appreciate the link!
ReplyDeleteHope you have a great weekend!
Michelle
www.delicateconstruction.blogspot.com
Very cute!
ReplyDeletethis is a fun idea! i love it:)
ReplyDelete