Friday, June 29, 2012

From Rags To... Wreath?

I went over to my parents house the other day and my Mom handed me a giant plastic bag and said, "Here's 10 yards of denim that a lady from Knit Well (the knit support group that my Mom runs) gave me. She bought it to make clothes for her husband but he didn't like the way the material felt. I figured you could use it for something." 
  
SCORE!!!
 
 Free is my favorite price and I'm lucky enough to have a family that regularly contributes free stuff to my crafting stash, much to Amazing Boyfriend Fiance's dismay. 
 
I brought it home and knew exactly what I wanted to make with it. 
 
 I signed up for the Craftaholics Anonymous semi-annual gift exchange and decided to make a wreath for my partner, Zoe! 

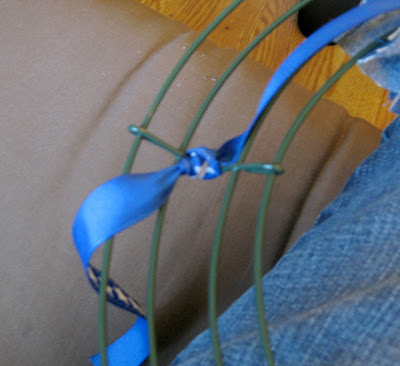
I cut my denim into 6 inch by 2 inch strips, although I wish I would have cut them longer. Maybe next time. Than I started tying them onto my wire wreath form and kept adding strips until my form was covered. 


Before I'd finished tying all my strips onto my wreath form, I attached a strip of ribbon as a wreath hanger. 


Once I had all the strips tied onto my wreath form, I still felt like it looked a little bare. 


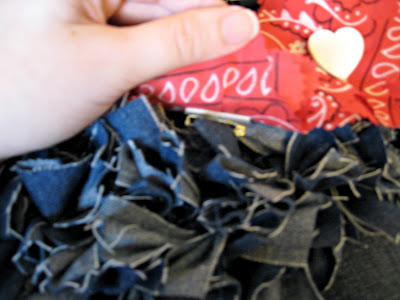
So I decided to add a few fabric flowers, and what better to use than bandanas!


I traced out circles onto my bandanas, then used my pinking shears to cut out the layers for each flower before gluing them together.


I glued painted wooden hearts to the center of the flowers, because I felt like they needed something else there, and added pins to the back of the fabric flowers before pinning them on the wreath. 


I love how it turned out!


I hope she likes it!


I was featured!!!


Craft Junkie Too Friend


I'm sharing this at the following link parties: 


~ Make It Great Monday @ Etcetorize ~ What's In The Gunny Sack @ The Gunny Sack ~ Craft & Tell @ Cherished Bliss ~ Talent Tuesday @ Vintage Wanna Bee ~ Tutorials & Tips Link Party @ Home Stories From A to Z ~ Take-A-Look Tuesday @ Sugar Bee Crafts ~ Show Me What Ya Got @ Not Just A Housewife ~ Tell Me Tuesday @ Me & My Boys ~ Too Cute Tuesday @ Funky Polkadot Giraffe ~ Time To Shine @ A Diamond In The Stuff ~ Your Whims Wednesday @ My Girlish Whims ~ Wow Me Wednesday @ Ginger Snap Crafts ~ Lil Luna Link Party @ Lil Luna ~ Wicked Awesome Wednesday @ Handy Man, Crafty Woman ~ Show & Share @ Southern Lovely, Lil Pink Pocket & Vintage Gwen ~ Transformation Thursday @ The Shabby Creek Cottage ~ Show Me Extraordinary @ The 36th Avenue ~ T.G.I.F. Link Party @ Craft Junkie Too ~ BFF Open House Link Party @ The Answer Is Chocolate ~ Delicately Constructed Fridays @ Delicate Construction ~ Project Party Weekend @ Bubbly Nature Creations ~ Weekend Bloggy Reading @ Serenity Now ~ Anything Goes Link Party @ Bacon Time ~ Creative Genius Link Party @ The Creative Paige ~ Weekend Wrap Up Party @ Tatertots & Jello ~ Free For All @ Young & Crafty ~ Show & Tell Saturday @ Be Different Act Normal ~ Strut Your Stuff Saturday @ Six Sisters' Stuff ~ Whatcha Got Weekend @ Lolly Jane Boutique ~ Saturday Seven Party @ Positively Splendid ~ Sunday Show Off Link Party @ Twigg Studios ~ Think Pink Sundays @ Flamingo Toes ~ Sundae Scoop Link Party @ I {Heart} Naptime


Tuesday, June 26, 2012

Where Did June Go?

After helping Amazing Boyfriend Fiance get out the door and off on a camping trip with his cousin, I sat down at the computer desk to take advantage of the "good" computer in his absence and happened to glace down at the calendar that sits on the desk top. 

I came to the startling realization that June is almost over!

When did that happen? 

I feel like the month was just starting! I had plans to make my Dad an awesome Father's Day gift (that didn't happen, but I did make him an awesome card), I wanted to do something fun for my nephew's first birthday (I lamed out and bought him a cute outfit that he could wear to our wedding), and plans for tons of wedding projects.

What happened, you might ask? 

Life happened. 

I picked up some extra hours at work, which you wouldn't think would make such a difference but it does. We had a death in the family, which was unexpected and hard on everyone. We found out that ABF's chemo treatments were not going as well as we had hoped and now we're switching to a different treatment plan, which has been a little disheartening. Not to mention a million other little things that pop up, especially when planning a wedding. 
Not that I'm complaining (okay, I'm complaining a little), but I'm sincerely surprised at just how quickly this month has flown by. 

 So hopefully there are people out there still reading this (although I wouldn't be surprised if you weren't, I'm getting kind of lame), and understand that life happens... projects don't get finished on time... pictures don't get taken... and I don't always have something super cool and awesome to share... but I'll try to do better... next month... 

Wednesday, June 20, 2012

Coming Soon To A Mailbox Near You!

For the invitations to our handfasting ceremony, I wanted something unique. (Of course!) I went to my friend Christie, scrapbooking/paper crafting extraordinaire, to pick her brain a little and see if she had any ideas/knowledge she could throw my way. 


This is what we came up with!


This is what the outside looks like...


This is what the inside looks like... 


 (Yes, I did smudge out the location details.)

The invitation is a gate card with a burlap and ribbon sleeve. I love how they turned out!

I even got Amazing Boyfriend Fiance in on the action!


I had him cutting and putting together the direction cards I inserted into the invitation before I added the sleeve.

Once I got the cards put together and inserted our direction card, all I had to do was add the sleeve. I used a piece of scotch tape to hold the burlap together.


Did you know that glue dots work on burlap? I experimented and found out for myself that they work! I used glue dots to stick the ribbon to the burlap before I tied the knot.


Oh yeah, before I added the ribbon I sealed the edges using a candle, so they wouldn't fray.


Once I had the ribbon glued on, I tied the ends into a knot before slipping them into my envelopes.


It was a lot of work to get these finished, and of course they're late getting sent out, but they're finally done and on their way out to our guests.

80 more days!!!


I'm sharing this at the following link parties:

~ Make It Great Monday @ Etcetorize ~ What's In The Gunny Sack @ The Gunny Sack ~ Craft & Tell @ Cherished Bliss ~ Talent Tuesday @ Vintage Wanna Bee ~ Tutorials & Tips Link Party @ Home Stories From A to Z ~ Take-A-Look Tuesday @ Sugar Bee Crafts ~ Show Me What Ya Got @ Not Just A Housewife ~ Tell Me Tuesday @ Me & My Boys ~ Too Cute Tuesday @ Funky Polkadot Giraffe ~ Time To Shine @ A Diamond In The Stuff ~ Your Whims Wednesday @ My Girlish Whims ~ Wow Me Wednesday @ Ginger Snap Crafts ~ Lil Luna Link Party @ Lil Luna ~ Wicked Awesome Wednesday @ Handy Man, Crafty Woman ~ Show & Share @ Southern Lovely, Lil Pink Pocket & Vintage Gwen ~ Transformation Thursday @ The Shabby Creek Cottage ~ Show Me Extraordinary @ The 36th Avenue ~ T.G.I.F. Link Party @ Craft Junkie Too ~ BFF Open House Link Party @ The Answer Is Chocolate ~ Delicately Constructed Fridays @ Delicate Construction ~ Project Party Weekend @ Bubbly Nature Creations ~ Weekend Bloggy Reading @ Serenity Now ~ Anything Goes Link Party @ Bacon Time ~ Creative Genius Link Party @ The Creative Paige ~ Weekend Wrap Up Party @ Tatertots & Jello ~ Free For All @ Young & Crafty ~ Show & Tell Saturday @ Be Different Act Normal ~ Strut Your Stuff Saturday @ Six Sisters' Stuff ~ Whatcha Got Weekend @ Lolly Jane Boutique ~ Saturday Seven Party @ Positively Splendid ~ Sunday Show Off Link Party @ Twigg Studios ~ Think Pink Sundays @ Flamingo Toes ~ Sundae Scoop Link Party @ I {Heart} Naptime


Monday, June 11, 2012

Crazy for Card - Making

I've said before that I've never really been one for paper crafting, but I think I've been changing my tune. Lately, I've been venturing into card making, which might have stemmed from designing and planning out my wedding invitations. Anyway, I've been having a lot of fun with it, especially with some of the designs that I've purchased from the Silhouette Store. 

I made a few Mother's Day cards for Amazing Boyfriend Fiance to give to our Mom's.


 I know I'll be needing some cute thank you cards to send out after our wedding in September, so I might as well get started on them now.


I'm not the only one getting married this summer, my cousin Kim is getting married in July! I thought I'd plan ahead and make her cards for her bridal shower and her wedding.


Speaking of stock piling cards, I got these adorable little cards designs from the Silhouette store and made up a few so I'll be all prepared for the next baby shower I'm invited to.


And while I was at it, I just made a few others to have hanging around, ya know, just in case...


These cards were inspired by this picture via Pinterest

These cards were inspired by this picture via Pinterest


At least I know I'm prepared, for whatever occasion I should need a card for! 


Tuesday, June 5, 2012

Do You Smell Something Burning?

Quite awhile ago, when Amazing Boyfriend Fiance was first diagnosed with cancer, he also came to the conclusion that he wasn't able to work anymore. To occupy his time he tried to find hobbies to work on. He bought model cars (most of which are still in boxes), he bought an aquarium and everything to keep fish, he bought us an array of indoor plants that grace our windowsill, and he bought a woodburning tool. 

The poor woodburning tool hasn't been used once since he bought it. 

But after seeing a few crafts using wood burning, that I wanted to give it a try. It's not like ABF was using it.  

So I decided to plug it in, put on some safety glasses (hey, safety first!) and burned some letters into a piece of practice wood. After trying out the different tips, I was ready to give a few projects a shot.  


I do have to give ABF some credit on this project. He burned the edges of the signs with a blow torch for me. 


 The actual wood burning was all me. I drew the letters lightly on the wood pieces before tracing them with the wood burner, using the fine tip.Than I used a wider tip to enhance the letters and make them stand out more. 


When I was done with the wood burning, I drilled a few holes into the wooden heart pieces and strung some twine through them. 


They'll make perfect chair signs for our wedding in September! 


96 days and counting!!!

Related Posts Plugin for WordPress, Blogger...