
This was the project that I made just in case I went on to round 2 in One Month To Win It, since the contestants only found out if they were moving on less than 24 hours before their next project was due. Since I didn't move on, it was lucky for me that I made this project for my cousin Kim to use as part of her wedding decor, so it wasn't a complete waste of time.

Wanna see how I did it?


I've been featured!!!

I'm sharing this project at the following link parties:


It's a decoupaged wooden suitcase with a chalkboard painted lid that will be used as a basket for cards on her gift table at her wedding. I love how it turned out, and I think it could be used for a lot of different things, such as holding utensils and napkins for a buffet table, or just as a sign in general.
Wanna see how I did it?

Supplies:
suitcase (wooden or real, doesn't really matter)
paint
chalkboard paint OR non-sanded tile grout
decoupage medium
paper for decoupage (I used wrapping paper)
paint brushes
ribbon (optional)
glue gun & glue sticks (optional)
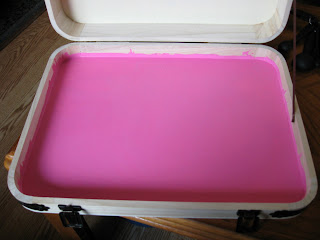
I started by painting the inside of the suitcase. I started with the chalkboard paint, since it was the biggest pain in the butt. Now, there are two ways you can There are MANY brands of chalkboard paint available (Folk Art and Martha Stewart paint have a variety of colors) and you can take the easy way out and use the store bought chalkboard paint, but I was making this for the DecoArt week of OMTWI, so I made my own chalkboard paint using Americana Carousel Pink paint and non-sanded tile grout. The formula (thank you, Martha Stewart) is 2 Tablespoons non-sanded tile grout for 8 oz of paint. I used one 2 oz. paint bottle and 1/2 Tablespoon non-sanded tile grout to create the chalkboard paint for my suitcase (and still had plenty left over!) Stir REALLY WELL before applying with a sponge brush.


When I had my chalkboard paint finished, I painted the inside edges of the suitcase, and was very careful going around the inside edge next to the chalkboard paint.

Once the inside was painted and mostly dry, it was time to paint the outside of the suitcase. The outside of my suitcase had metal details, so I had to very carefully paint around them. But I only had to paint the sides, and part of the handle. Or you could paint the entire handle, but I had something else planned for that part, so I left it unpainted.


Once the outside was completely painted and dried, it was time to decoupage! I used the suitcase as a template for the two pieces of wrapping paper I was using on the outside. For the inside, I measured out the length and width, cut out a piece of wrapping paper that size and pressed it into the bottom and smoothed it down. Since my suitcase had rounded corners, I creased it around the corners, then trimmed it to the appropriate size. (Of course, I didn't get pictures of that part. I know, bad blogger!)


Once I had my paper pieces all cut out, I was ready to go. I decided to start on the inside, and do the outside pieces last. Working quickly, I spread a thin layer of decoupage medium in the corner area and worked my way out and across, making sure to smooth out bubbles and wrinkles as I go. I even used an empty Michael's giftcard to help smooth out my paper as I went. Once I had the inside done, I moved to the outside, using the same technique.


Once the decoupage medium was dry, I varnished the whole suitcase (EXCEPT the chalkboard painted area) with a satin finish polyurethane varnish. The reason I used the varnish is because when I went to go buy the DecoArt decoupage medium, they were sold out of the satin finish decoupage medium, so I bought the matte decoupage medium, and decided to use the satin finish varnish to get the look I wanted. If you're not as picky, or have the decoupage medium in the finish that you want, you can just go ahead and use your decoupage medium to seal your project.

After my varnish had dried, the last step was to cover the handle. I decided to use black satin ribbon and my glue gun, to wrap around the handle. I used dabs of hot glue as I wrapped to secure the ribbon.


Once my handle was covered, I was finished!
Now my cousin has a unique and useful decoration for her gift table. That's one of the fun parts about helping out with weddings, I love all the unique details that some brides have let me add to their special day.
I've been featured!!!
I'm sharing this project at the following link parties:
LOVE!! The color and pattern are my faves!! I would be honored if you came and shared over at Passionatelyperfect.com!! Your newest follower!
ReplyDeleteAdorable! Great colors!
ReplyDeleteThat's fantastic! I love how cool wrapping paper can be used for projects and it's relatively inexpensive.
ReplyDeleteAdorable! Love the colors. :) What a great idea.
ReplyDeleteOhhh...I love it! Your cousin is so lucky! ~Tonia @TheGunnySack.com
ReplyDeleteHi Bethany! Thanks sooo much for sharing your FABULOUS project with us! I've featured it over at my facebook page here -->http://www.facebook.com/pages/Craft-Junkie-Too/162946417058976
ReplyDeleteWhen you have a change stop by my blog at http://www.craftjunkietoo.com and grab the Featured Me button for your blog….
Thanks so much! :)
Tracy
Great tutorial! Looks great! Thanks for linking up to the Tuesday Talent Show! I hope to see you again next Tuesday!
ReplyDelete-Nikki
Chef in Training
http://www.chef-in-training.com