I just can't seem to get enough of projects with fabric paint.
It's just such awesome stuff!!!
After making a Blazer shirt for my brother (that's highly inappropriate and I just can't bring myself to post it here, even though I love it), St. Patrick's Day shirts for me and Amazing Boyfriend, and my "Big Girl" Panties, I'm sure that all of you are sick of my projects that involved fabric paint. But there's just so much that I can do with it! I keep coming up with projects I can use it on.
So instead of posting separate posts of all the fabric paint projects I've been working on I figured I'd show them all off in one picture filled post. That way if you really are interested you can check it all out, and if you're only sorta interested you can just look at the pretty pictures instead of reading the whole thing, and if you're not interested at all then you're probably not reading this anyway.
The first project is fabric painted onesies for my unborn nephew, Jackson. I was supposed to give these to his Mom at a baby shower in the end of March but that was when one of my nieces gave me the plague and I stayed home from the baby shower, not wanting to spread my germs. But since my Mom is also having a baby shower for the proud parents, I already have a present ready.

These are the 6 month onesies.
I love this little shirt. I tried to make the lizard look like it was climbing out of the little pocket.
The next project that I have is a couple of shirts that I made for my niece, Gabby, for her 16th birthday. I'm pretty stoked with the way that these came out, although the birdcage stencil was a giant paint in the @$$ and I'm pretty sure I'll never be using that design again. If it wasn't totally uncool to have matching shirts with your Aunt I'd totally copy these designs for myself, but I think they'll look better on her anyway.
(do you see the detail on the birdcage? Took me an hour to iron on the stencil!)
Since I was already making a shirts for my niece, I decided to paint a couple for myself as well.
My brother David and I are going to game 6 of the Playoff series between the Portland Trailblazers and Dallas Mavericks. Of course, I had to make shirts for both of us to wear to the game. I apologize in advance for the wording on my brother's shirt, since it's pretty inappropriate, although we did censor it so we wouldn't get thrown out of the game. But I LOVE my shirt! It was the first time I used the velveteen fabric paint and I think both of the shirts came out awesome!!
I already made these for my youngest niece, Kirra, for her birthday, but I couldn't resist making her a couple of T-shirts as well. Especially since the "no more monkeys jumpin' on the bed" saying is kind of a joke with her. (She LOVES jumping on the bed, much to her Uncle David's dismay, as that's her favorite way to wake him up in the morning.) This was my first attempt at using the Fashion Glitter and Glitter Bond, which I used on the monkeys. I think it worked out pretty well, but Amazing Boyfriend and I like the cupcake shirt better.
I also reused one of the designs of Kirra's shirt on a onesie for my best friend, Gracie, who recently found out she's having a baby. I've already been informed that this baby will be my niece/nephew and the baby will never even know otherwise. Yeah, I'm cool with that. Anyway, Gracie had a crazy dream one night, which I'll spare you the details, but needless to say there was a monkey involved, which has already turned into a nickname for baby since we currently don't know if the baby is a boy or a girl. (Although Gracie and I are on Team Girl!)
There, I know that was a lot of projects for one post, but it wasn't so bad now, was it?
(Yup, Amazing Boyfriend is rolling his eyes at me as I type this)
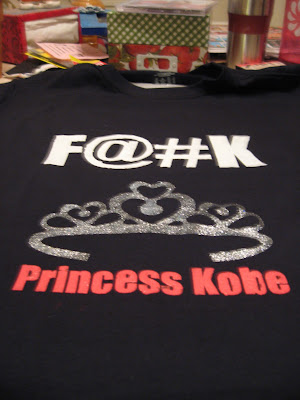
Okay, I'll post one picture of my brother's highly inappropriate shirt that I mentioned at the beginning of this post. Just be warned that it's not very nice.
Last change to look away!
Yes, that IS a glitter tiara! He actually did wear this to a Blazers vs. Lakers game in February, and got lots of compliments. Obviously, the hatred for the Lakers runs pretty deep. I still find it funny that I got him to wear a shirt that has glitter on it.
I'm sharing this post at the following link parties:
These are the 3 month onesies.

These are the 6 month onesies.
I love this little shirt. I tried to make the lizard look like it was climbing out of the little pocket.
The next project that I have is a couple of shirts that I made for my niece, Gabby, for her 16th birthday. I'm pretty stoked with the way that these came out, although the birdcage stencil was a giant paint in the @$$ and I'm pretty sure I'll never be using that design again. If it wasn't totally uncool to have matching shirts with your Aunt I'd totally copy these designs for myself, but I think they'll look better on her anyway.
(do you see the detail on the birdcage? Took me an hour to iron on the stencil!)
Since I was already making a shirts for my niece, I decided to paint a couple for myself as well.
My brother David and I are going to game 6 of the Playoff series between the Portland Trailblazers and Dallas Mavericks. Of course, I had to make shirts for both of us to wear to the game. I apologize in advance for the wording on my brother's shirt, since it's pretty inappropriate, although we did censor it so we wouldn't get thrown out of the game. But I LOVE my shirt! It was the first time I used the velveteen fabric paint and I think both of the shirts came out awesome!!
I already made these for my youngest niece, Kirra, for her birthday, but I couldn't resist making her a couple of T-shirts as well. Especially since the "no more monkeys jumpin' on the bed" saying is kind of a joke with her. (She LOVES jumping on the bed, much to her Uncle David's dismay, as that's her favorite way to wake him up in the morning.) This was my first attempt at using the Fashion Glitter and Glitter Bond, which I used on the monkeys. I think it worked out pretty well, but Amazing Boyfriend and I like the cupcake shirt better.
I also reused one of the designs of Kirra's shirt on a onesie for my best friend, Gracie, who recently found out she's having a baby. I've already been informed that this baby will be my niece/nephew and the baby will never even know otherwise. Yeah, I'm cool with that. Anyway, Gracie had a crazy dream one night, which I'll spare you the details, but needless to say there was a monkey involved, which has already turned into a nickname for baby since we currently don't know if the baby is a boy or a girl. (Although Gracie and I are on Team Girl!)
There, I know that was a lot of projects for one post, but it wasn't so bad now, was it?
(Yup, Amazing Boyfriend is rolling his eyes at me as I type this)
Okay, I'll post one picture of my brother's highly inappropriate shirt that I mentioned at the beginning of this post. Just be warned that it's not very nice.
Last change to look away!
Yes, that IS a glitter tiara! He actually did wear this to a Blazers vs. Lakers game in February, and got lots of compliments. Obviously, the hatred for the Lakers runs pretty deep. I still find it funny that I got him to wear a shirt that has glitter on it.
I'm sharing this post at the following link parties:


